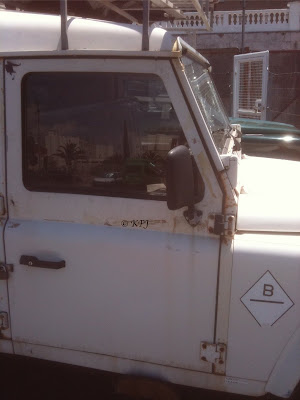
Last but not least, the windscreen.
This was the one we really lacked confidence for. Anyways, usual story, knock out all broken glass. Remove window seal and get rid of rest of glass.
Lubricate both faces of seal. Refit to glass. Start to insert glass and seal, slowly and carefully into frame.
Fuck it up at last corner. Oh well, it was worth a try.
Plan B
Undo all bolts from roof and jack up with hi-lift jack. Place bits of wood at each side and then remove HLJ.
Take out frame. Take to glass firm in La Linea (Carglass). Return on appointed day - come tomorrow, mañana of course - which was Fiesta! For ever! so shop was shut. Slouch home miserably.
Wait for them to ring - which they did a few days later, asking where we were?
Go to collect glass. Ouch!! Cost more than everything else put together.
Refit. In reverse order. Luckily it hadn't rained.
And there we are. All sorted. Give or take striker plates, and a few other door problems. But hey, looks a hell of a sight better than it did.
Costs, and lessons learned on final post to follow.
Check out the new music on the sidebar. It's relevant.
Had a bit of a musical fit with this one too - every caption sings a song.
Who shot the sheriff?
Heart of glass?
Broken down angel
Highway to hell
Spanners - from the album 'A spanner in the works'
Broken down
Led Zep - The Rover
Jumping jack flash
The Jack
The very best - hit the road, Jack
Wild Rover
Breaking glass
Back on the road again
Tuesday, 11 January 2011
Monday, 10 January 2011
What a pane (4) - a wind up?
Getting there. Front door windows next. We'd looked for some decent doors because ours need replacing, but had to settle for the windows only.
Like the rest of the glass, they are windy up ones, not sliding, so sorting out the scissor-style winding mechanism was something to contend with for the first time.
Remove door card. Then remove all broken glass (lots) from inside the door. Take out metal panel and winding mechanism.
Insert glass at an angle, ensuring ball rollers go into the track at the bottom of the glass. Again two pairs of hands are good. Three would be better and then there might be more photos.
Sunday, 9 January 2011
What a pane (3) - own goal - no strikers
We found a lot of glass at a Málaga scrapyard. What we didn't find was glass for the middle doors, or even any decent replacement middle doors.
But, after a drive up to the scrappy at Arcos de la Frontera, we found some middle doors, complete with glass. They were from an earlier model, but hey anything will do when you are struggling.
It had taken us ages to find the scrappy. The directions we had been given initially were not good, but once we got to Arcos, we just kept asking in Spanish for the scrapyard. Each time we asked (we were taking it in turns at this point), everyone gave us directions so far - and then said 'ask again when you get that far.' Which was exactly what we did.
Gotta love the Spanish though because it worked. Although I was slightly worried when we spoke to a council worker who kept repeating the directions. By the time he had finished I thought we had to turn left 50 times.
We arrived around 1.15/1.30pm. Not good. There was a queue. Spanish scrapyards are - er - not like British ones. You don't go armed with screwdrivers and socket sets happily to dismantle bits and put them in your basket to pay at the check-out.
Oh no. You tell them what you want and they look it up and then dismantle it for you.
We spotted a promising looking Santana and asked if we could go look. Spaniards shrugged their shoulders at crazy foreigners. Perfect!! Middle doors (ours were crap anyway and needed replacing).
'We can't do it now so come back at 5pm after siesta.' How long does it take to take off a couple of doors? Did we want to wait three and a half hours? Not forgetting we hadn't brought the dog as it was hot so he was on his own in the flat.
Assertive Brits swung into action and we said we would take off the doors. Spaniards looked surprised as this is all part of the service and why would you want to do something yourself? But they agreed. We shot up to the Santana and had the doors off in no time. Young lad came with a small car to take them back to the check-out. We paid up and off we happily went.
What had we forgotten in our haste to rip off the doors before lunchtime and closedown? The striker plates. Another trip may be called for. If they even have the same vehicle or a similar one. Live and learn.
Don't think you need the details for this one. But anyway.
Remove door card and check strap that prevents door from swinging wide open. Undo screws and nuts on hinges. Lift up the door and pull it out. Preferably with an assistant.
Replace in reverse order :D
Saturday, 8 January 2011
What a pane (2) - in the rear
We hadn't been unlucky enough to have to do this one before. The hardest bit here was getting the small rubber back in - the equivalent of the one that covers the pop rivets on the side window.
Procedure
Knock out as much broken glass as possible.
Take out the small rubber from the centre of the big rubber.
Remove big rubber from door and clean out all remaining glass.
Lubricate the face (that fits into the opening) of the big rubber with washing-up liquid and refit to door.
Then lubricate the other face that will take the glass.
Next, fit glass. Very carefully. In our case, using a blunt flat-head screwdriver (ie British rather than American) and a putty knife.
The final part of this is fitting the small rubber. It is a good idea to remove your spare wheel if it is on the back door. Sadly this wasn't possible as one of our mates had borrowed the relevant socket.
Lubricate this as well, and with patience and the same screwdriver, it eventually fits in.
Back window before
Interior of rear door
Glass out
Rubber seal in
Exterior of rear door
Glass out
Rubber seal in
Pushing new glass gently into place
Getting distracted
And that last piece of rubber
Using the screwdriver carefully to push the rubber into place
New glass and rubbers finally in
And then, time to do a bit of cleaning out too.
Glass gets absolutely everywhere :(
Friday, 7 January 2011
What a pane (1) - offside!
Last year, some unpleasant person, or persons unknown, smashed the windows in our Santana. Not just one, but virtually all of them, including the windscreen.
There is nowhere to source them in Gib, and the cost of getting new glass or doors shipped from the UK was prohibitive.
If the intention was to put us off the road, then it wasn't a bad start.
Still, with the help of friends, we managed to locate some promising scrapyards in Andalucía, and equipped with all the necessary bits of glass/doors, started to put it back together.
First the rear window. Either the vandals were getting tired at this point, or someone had appeared and they didn't want to be caught in the act, but only the left-hand side one was smashed. The one we had replaced the previous year in fact. Link here. Oh well, it seemed the easiest place to start as at least we had experience of it.
When we did this window the last time, we (ie he) didn't get the small aluminium box sections in the correct place. There are three of them at both the top and bottom, and they have tiny holes that need to align with the trim. The good news is, that if you confuse them when you take them off, you can work out what goes where because of the holes.
There is also one on each side, but that isn't such a problem in terms of confusion, but each one is a pig to get back in as the trim is very tight on the sides.
As before, it helps to have two pairs of hands, a) for the pop-riveting and b) for pulling the side trim around to fix the small box sections back inside.
So here we go .....
Well and truly smashed
Drilling out the pop rivets
Rivets out, next step frame
And frame out
Taking out the trim and box sections
Putting the frame back in
Gently pushing it back into place
The last step was to refit the rubber over the pop rivets, for pix of that, check out the previous post in the link above.
We've got quite good at this, and at least we did a better job this time having learned our lessons from before.
Subscribe to:
Posts (Atom)